


Your Ultimate Guide to Setting Up Your Creality Printer: Step by Step
Hey there, fellow 3D printing enthusiast! If you’ve recently unboxed your Creality printer, you’re probably excited to dive into the world of 3D printing. But before you unleash your creativity, there’s a little thing called setup that we need to tackle. Don’t worry; I’ve got your back! In this step-by-step guide, we’ll walk through getting your printer up and running without the usual headaches.
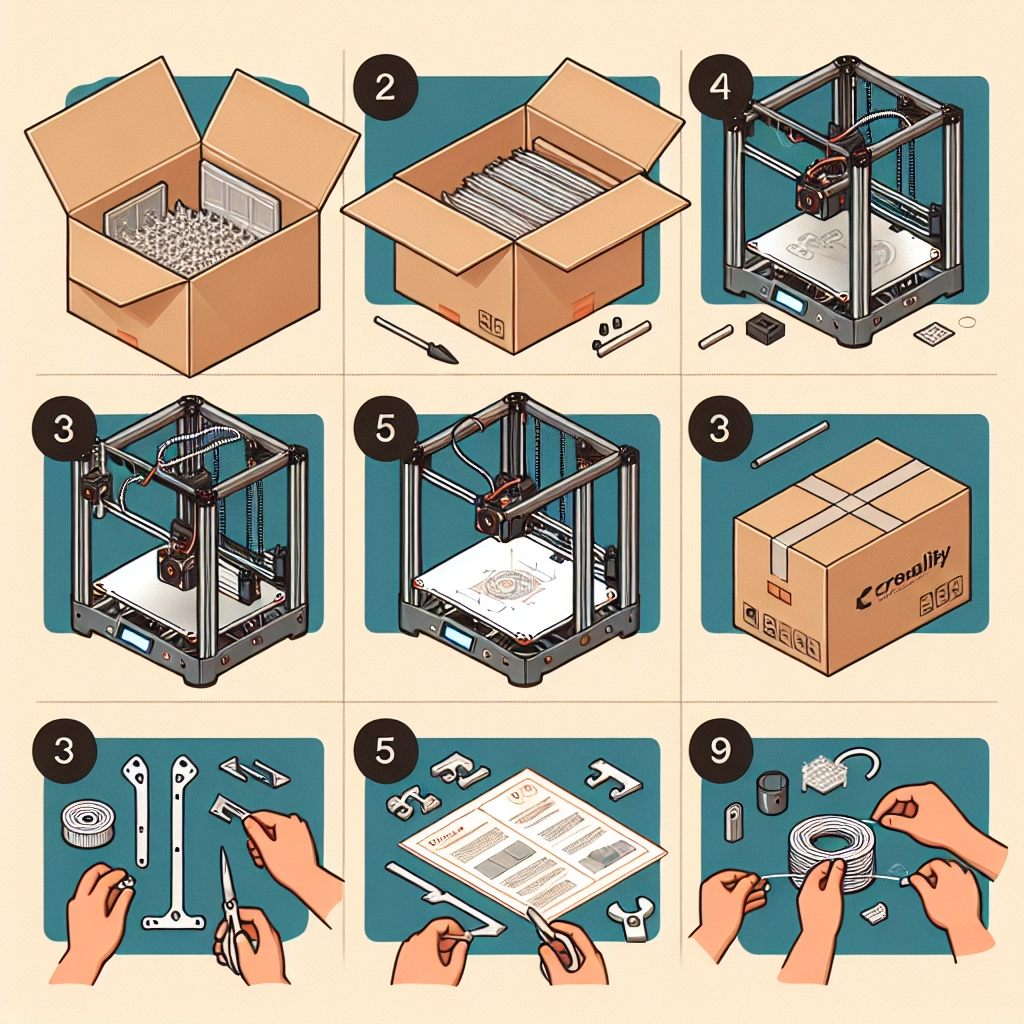
Unboxing and Assembly
First things first—let’s get your printer out of the box! Once you’ve got everything unpacked, take a deep breath. Familiarize yourself with all the components. Creality frequently includes detailed assembly guides, so make sure to refer to the manual specific to your model.
Step 1: Assemble the Frame
Most Creality printers come as part of a kit, which means you’ll need to put a few pieces together. Here’s a quick checklist:
- Frame: Start by assembling the main frame. Make sure it’s square and secure before tightening any screws.
- Vertical Supports: Attach the vertical supports to the base frame. Ensure you check the orientation; having everything the right way around saves tons of hassle later!
- Cross Braces: Adding these will give your printer extra stability.
While assembling, it might be helpful to have a friend or family member around for an extra set of hands. Plus, it can turn into a fun bonding activity!
Step 2: Install the Print Bed
Next up is the print bed. This is the area where all the magic happens—where the filament melts and turns into your creations.
- Attach the bed: Fasten the bed securely to the frame. You might also have a leveling knob for fine adjustments. Depending on your model, this may also include a heated bed which is great for enhancing print adhesion.
Step 3: Wiring It All Up
Once the physical parts are all assembled, it’s time to connect the wires. This can seem daunting, but follow these tips:
- Consult the manual: Always refer to your model’s user guide as the wiring setup can vary.
- Keep it organized: Tidy up your cables for better airflow and easier access later. Velcro ties or twist ties are great for keeping everything neat.
Initial Setup and Calibration
Now that the hardware is sorted, let’s turn our focus to getting everything set up software-wise.
Step 4: Level the Print Bed
This step is critical for successful prints. Use a piece of paper to measure the distance between the nozzle and the print bed.
- Manual leveling: Adjust the knobs on each corner of the bed until you feel a slight drag when sliding the paper between the nozzle and the bed. Aim for uniform tension across all corners. Remember, patience is key!
Step 5: Load the Filament
Next, it’s time to load the filament.
- Heat the nozzle: Preheat it to the recommended temperature for your filament type. If you’re using PLA, that’s generally around 200°C.
- Feed it in: Once the nozzle is hot, gently feed the filament until you see it extrude from the nozzle. Voilà! You’ve successfully loaded your first filament.
Step 6: Test Print
Before launching into a massive project, it’s wise to start with a test print. Most printers come with pre-sliced test models on the SD card, so you won’t even need to start from scratch.
- Choose your model: Pick something simple like a calibration cube.
- Monitor your print: Keep an eye on the first layer; this is crucial for good adhesion and a successful print overall.
Maintenance Tips for Success
Once your printer is working fantastically and your prints are coming out amazing, it’s essential to keep the good vibes going. Regular maintenance is key:
- Daily upkeep: Clean the nozzle regularly to prevent clogs.
- Check the bed: Make sure it’s clean and level before each print.
- Tidy cables: A well-organized printer is a happy printer!
Setting up your Creality printer shouldn’t feel like a hurdle; think of it as the first big leap into your 3D printing journey. Once you’re equipped with a thriving workspace and some creativity, you’ll be amazed at what you can create! Enjoy the process, take your time, and soon enough, you’ll have a library of 3D printed pieces that will showcase your skills and imagination. Happy printing!