


The Best Practices for Post-Processing Your 3D Prints
If you’ve dipped your toes into the fascinating world of 3D printing, you know that success doesn’t just stop at pressing print. In fact, the magic really happens once your model is out of the printer. Post-processing your 3D prints is where you can truly refine that creation, breathing life into your design with a few additional steps. Whether you’re a hobbyist or a professional, let’s unpack some of the best practices for post-processing your 3D prints that will make your models shine.
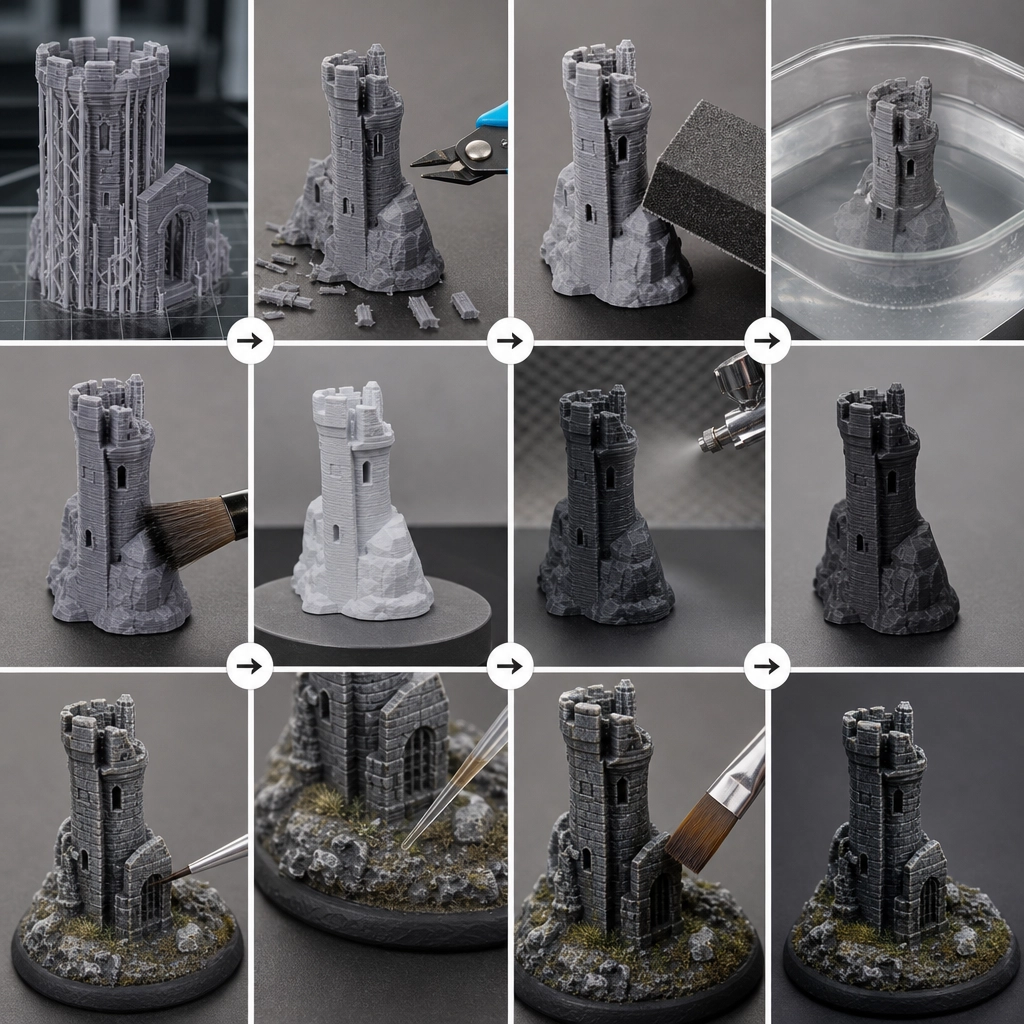
1. Understanding Your Material
Different materials require different post-processing techniques. For instance, if you’re working with PLA filament, you might notice it’s fairly easy to work with. On the other hand, materials like ABS can be a bit trickier; they may require additional steps to smooth out and perfect. Always check your filament’s specifications and understand its properties. This knowledge will help guide you through post-processing more effectively.
2. Cleaning Your Print
Once you remove your print from the build platform, it’s essential to clean off any support structures or rafts that may have been necessary during the printing process. A pair of precision pliers or snippers can come in handy here. Be sure to gently remove supports to avoid damaging your actual print. Additionally, a quick wash with warm soapy water can help eliminate any residue from the printing. For those who tend to get a bit messy with glue or filament, you might consider a gentle scrub with a soft-bristle toothbrush to get into the nooks and crannies.
3. Sanding for Smooth Surfaces
Sanding your prints can greatly enhance their aesthetic appeal. For best results, start with a lower grit sandpaper (around 200 grit) and gradually move up to a higher grit (up to 1000 or finer) for a smoother finish. Be sure to sand with the grain of the print, and be gentle—too much pressure can affect the structure of your model. Remember, patience is key. Spend a little time on sanding, and you’ll be rewarded with a print that looks professionally made.
4. Liquid Smoothing Techniques
If you’re dealing with prints made from ABS filament, consider using acetone vapor smoothing. This method involves placing your print in a sealed container with a small amount of acetone, allowing the vapor to gently smooth the surface of the print. It’s a popular technique but requires caution; always handle acetone or any solvents in a well-ventilated space and while wearing appropriate protective gear.
For PLA, you can use a product called "XTC-3D," which provides a coating that smooths the surface and gives your print a nice glossy finish with some additional strength. Apply it in a well-ventilated area, and you’ll notice a significant difference in your model’s texture.
5. Painting and Finishing Touches
Once you’re satisfied with the surface texture of your print, it’s time for color! A primer coat is an excellent first step—it helps the paint stick better and reveals any imperfections so you can address them before the final coat. After priming, use acrylic spray paint for an even finish, or fine-tipped paint brushes for detailed work.
Don’t forget to consider adding additional details or accents to your print, whether through hand-painting or incorporating different materials for contrast. Just think of it like choosing clothes for a special night out; sometimes, a well-placed accessory can elevate the entire look!
6. Assembly and Joining Parts
If your print is made up of multiple parts, assembly can pose a unique challenge. Using super glue or epoxy is common for joining parts, but for larger assemblies, consider mechanical fittings (like pins or screws) for added strength and stability. Always test fit each part before applying adhesive—there’s nothing worse than a misaligned finish!
7. Sealing for Durability
Your print might look amazing, but if it’s going to be exposed to the elements or heavy use, sealing it can help protect it. Clear acrylic coatings or specialized sealants can guard against moisture and UV, prolonging the life of your creation.
By now, you might see that post-processing is an essential part of 3D printing that can convert a procedural model into a true work of art. The time and effort you invest in these finishing touches will significantly enhance the appearance and durability of your prints. So, roll up your sleeves, put your creativity to work, and remember that the journey doesn’t end when the last layer gets printed—it’s just the beginning. Happy printing!