
Understanding Print Infill: How It Impacts Your 3D Prints
If you’ve dipped your toes into the world of 3D printing, you’ve likely stumbled upon the term “infill.” It sounds technical, but don’t let that intimidate you! Understanding infill is crucial for getting the most out of your 3D printer and ensuring your prints are as strong and efficient as possible. So, let’s break it down in a way that’s easy to digest and maybe even a bit fun.
What is Infill?
Infill refers to the internal structure of a 3D printed object. Picture it like the skeleton of a chair or the support beams of a house. In 3D printing, the infill pattern and density are what give your model strength while also affecting its weight and material usage. If you’ve ever printed something that seemed excessively heavy or felt flimsy, you’ve experienced the effects of infill firsthand.
Different Types of Infill Patterns
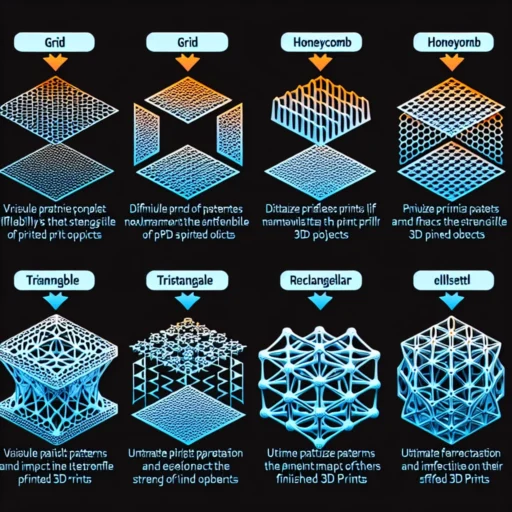
When you slice a model for printing, you’ll notice that most slicing software gives you various options when it comes to infill patterns. Some of the most popular types include:
-
Grid: This is a simple, efficient structure made up of crisscrossed lines. It provides good strength in various directions and is often a go-to for print quality.
-
Honeycomb: Known for its efficiency, this pattern resembles a beehive and can provide excellent strength to weight ratios. It’s particularly favored for lightweight models where strength is essential.
-
Triangles: This design uses triangular shapes, making it incredibly strong. It’s often used in models that need to withstand pressure from multiple angles.
-
Cubic: Featuring a 3D cube-like structure, cubic infill is great for adding versatility and stability, allowing for a balanced strength distribution.
The choice of pattern will depend on your project requirements, which brings us to the next consideration: infill density.
How Infill Density Affects Your Prints
Infill density is expressed as a percentage. A 0% setting means you’re printing a hollow object, while 100% indicates a solid print. Most common settings for infill density range between 10% and 50%, but it really comes down to your specific needs.
-
Low Density (0%-20%): Great for quick prototypes or aesthetic designs where strength isn’t a huge concern. These can save time and material but may not hold up well under stress.
-
Medium Density (20%-50%): This is a sweet spot for many users. It offers a balance between strength and material use, making it ideal for functional prints that don’t need to withstand extreme forces.
-
High Density (50%-100%): This is where you want to go if you’re printing something that requires a lot of strength, such as mechanical parts. While this offers the best durability, it also increases material usage and print time.
Implications for Your Printing Workflow
With a better grasp of both infill patterns and densities, consider how you can optimize your prints.
-
Assess Your Needs: Ask yourself the purpose of your print. Is it a decorative item, a functional tool, or something that requires durability? Your answer should guide your infill settings.
-
Experiment: Don’t be afraid to try out different patterns and densities. Each print can be an opportunity to learn what works best for your particular project. Sometimes it takes a bit of trial and error to find that perfect blend of efficiency and stability.
-
Keep It Eco-friendly: Remember that using less material not only saves costs but is also better for the environment. By optimizing your infill settings, you can create quality prints while minimizing waste.
-
Adjust for Filament Type: Some materials, like PETG, require different infill settings compared to PLA or ABS. Make sure to tweak your infill based on the characteristics of the filament you’re using.
Final Thoughts
Understanding print infill might seem like a small part of the bigger picture, but it can make a world of difference in the quality and effectiveness of your 3D prints. As you experiment with different patterns and densities, you’ll gain insights that could significantly enhance your printing strategy. So, whether you’re crafting intricate designs or robust functional parts, remember—the right infill is essential for achieving the results you desire. Happy printing!